Friday, November 14, 2014

Review: NYX Butter Lip Balm

I purchased the NYX butter lip balms a few months ago. I didn't look too much into them before purchasing them off of the website - I decided I would take a leap of faith and hope that they would be worth the money. I've been using them regularly for a while now, and have decided to write a small review about them. A lot of my friends and family know this, but I have something I must admit. My name is Elise, and I am addicted to chapstick. I have one stashed in every room of the house and I have at least three floating around my purse and backpack at all times. I have five on my vanity alone. I have at least ten unopened packages stored in one of my drawers. I'm very picky about my chapstick and lip balms, and so I thought that this would be a suitable post for me. Let's jump right into it then!

Pigmentation
These lip balms come in eight different colors: Parfait, Mauve, Red Velvet, Macaron, Marshmallow, Biscotti, Panna Cotta, and Brownie. They are on the NYX website for four dollars each. A bit pricey for a chapstick/lip balm in my opinion, but I suppose the pigmentation adds to the cost. I purchased two different colors: Parfait and Red Velvet.

These are only lip balms, and therefore the color pigmentation is very faint, but still enough for it to be noticeable. It's nothing close to a lipstick and slightly less noticeable than a lip gloss because it has more of a matte finish, so there's no shine to bring it attention. It has a slight shine in pictures and upon first application, but it dries to a velvety/semi-matte finish to make it look really natural.

Parfait: On the website, it is described as "fuchsia with blue undertones." I would say that this description is spot on.


This color is definitely my favorite of the two. I think that cool undertones look better with my skin color. It's not super noticeable and I feel like it mostly just enhances the natural color of my lips.

Red Velvet: On the website, it is described as "pure red." When I purchased this, I had very high expectations and I have to admit that I was slightly let down.


After initial application, it looks fine. But I feel like the color doesn't last on this one. It fades in the middle and makes it look like I'm wearing a faded, red lip liner. Someone on the website described it as looking like you just ate a popsicle, and it does look like that. Maybe a two year old that ate a popsicle. I just think the red color does not look good on me after a little bit of wear. I still use it, but usually before I am going to apply a red lipstick or lip gloss, just to moisturize my lips and add to the color I am going to be applying.

Moisturizing Qualities
Just to let you know where I stand with chapstick, I'll tell you the kind that I prefer. My holy grail of chapsticks is definitely my original Burt's Bees chapstick. That is my favorite because I can feel it moisturizing my lips. I do not like baby lips at all, as most people do. I feel like it only coats the surface and slides right off after after I rub my lips together a couple of times. I like chapstick that sinks into my lips and stays put for a long time. So, now that you know what I look for, on to the NYX butter lip balm analysis.

This lip balm really is buttery, without the slippery, greasy feeling, of course. It goes on so smooth and rubs in so nicely. It's not slick or slimy and feels amazing on my lips. I love rubbing my lips together when I am wearing it because it just feels so smooth and, I don't know, nourishing, I guess.

It does last for a significant amount of time. It can last me three hours just fine, even with sips of water here and there. After eating, though, I definitely need to reapply. My lips get chapped and dry very easily and for this to last three hours is great to me. Most of my chapsticks don't last me that long. My Burt's Bees can last me four to five hours and baby lips lasts me thirty minutes, at most. I usually reapply my chapstick every couple of hours just to avoid ever having my lips go dry on me, but sometimes at school and work, I don't get the chance to reapply as much as I would like to. Plus, with wearing a lip balm with pigmentation, in order to keep the color fresh you need to reapply every couple of hours, maybe even every other hour. But that's only if you don't want the color to fade.

Overall, these lip balms feel great on my lips. In fact, I just put some on and I can't stop rubbing my lips together as I type this. The lasting power is great for me, even when drinking, but not after eating.

Final Verdict
I would say that she lip balms are adorable, smell delicious, feel great, and are very much well worth the money. I plan on purchasing the color Biscotti next and possibly even Panna Cotta.

Let me know if you give these a try and what colors your decide to try! If you have any further questions please feel free to leave me a comment. Thanks for reading!

Sunday, October 12, 2014

My Foundation Routine [With Video!]

I have a lot of family members and friends that always ask me about how I do my day-to-day foundation routine and I decided to finally write about it to share with everyone. I watched so many videos on YouTube and read reviews of products and researched about how to contour and highlight and all the jazz. With all of my research, I learned that even though one beauty guru on YouTube might it do a certain way, doesn't mean that way will work for me. After trial and error, playing around, and all of my research, this is my customized way of how I do my everyday foundation routine.

Products Used

✿ Primers ✿
- No7 Beautifully Matte Make Up Base
- Monistat Chafing Relief Powder-Gel

✿ Foundation ✿
- Covergirl Outlast Stay Fabulous 3-in-1 Foundation (Classic Ivory)

✿ Contouring ✿
- Maybelline Fit Me Shine-Free Foundation Stick (Coconut)

✿ Bronzer ✿
- Physician's Formula Organic Wear Bronzer

✿ Blush ✿
- Mary Kay's Sample Blush (Apricot Breeze)

✿ Setting Powder ✿
- ELF High Definition Powder
- NYC Color Wheel (Rose Glow)
- Physician's Formular Organic Wear Powder

Visual Aid

Since it can be difficult to explain everything I'm trying to say, I filmed a quick little video for a visual aid. I hope this makes it easier to understand what I explain. I would suggest watching the video and following along with the titles in this blog that correspond to the titles in the video. Enjoy my double chins, awkward expressions, and shifty eyes.

MAKE SURE TO WATCH IT IN HD!

Moisturize

Because I have extremely sensitive skin that is extremely dry right out of the shower, I use my Olay Moisturizing Lotion very generously all over my face and neck. I apply a thick coat right when I get out of the shower or after I wash my face in the morning and then let it dry. Then I apply another thin layer all over and let that dry. This moisturizer works the best for my combination skin and it doesn't irritate it.

Moisturizing is essential. I don't care what kind of skin you have: oily, dry, normal, combination - whatever! You must moisturize your skin to keep it healthy; especially if you are going to be wearing makeup. Find a moisturizer that works best with your skin and test it out before putting a full face of makeup on over it. The last thing you want is to get some kind of lotion that irritates your skin and then halfway through the day your face is burning and breaking out (it has happened to me before and trust me, it's not fun).

Prime

Not everybody primes their face, but I have found that it helps to minimize my pores and keep my makeup from moving throughout my long work and school days. I use two different primers. I haven't seen anybody else use two primers, but since I have combination skin that tends to get oily throughout the day, I have found that using two different primers really helps to keep my makeup fresh throughout all of my sweating and face-rubbing.

First I go in with my No7 Beautifully Matte Make Up Base. I put a small amount on my index finger and rub it together to warm it up a bit. I focus this primer mostly on my eyebrows since I put a lot of product on my eyebrows. I also pat it around my eyes and t-zone. I do not rub this primer in, I pat it over my face. This primer is really drying because it is mattifying. If I rub it in, the primer rubs off and my skin looks flaky and too dry. But when I pat it over areas of my face, it still works and doesn't give my face that flaky-look.

Next I go in with my Chafing Relief Powder-Gel by the makers of Monistat. I know it seems weird to put this on your face, but this stuff works wonders! Again, I put a little dab on my index finger and rub it together before applying it to my face. I put this on my forehead, cheeks, and especially around my nose. It is silicone-based and slides right over my face. A little bit goes a long way with this product. I pretty much rub this all over, but I try not to get a lot on my eyebrows since I want my matte primer to be more prominent there. This primer helps to minimize the pores on my nose. It creates a protection layer between my skin and my makeup, so my pores aren't getting clogged up with foundation. My face feels like it can breathe throughout the day and I don't get that cakey feeling after sweating. This stuff is my holy grail product. I love it.

Foundation

Using my Jessup Foundation Brush, I apply my Covergirl Outlast Stay Fabulous 3-in-1 Foundation. I first apply it to my neck, making sure to buff it in and blend it out very thoroughly. I then apply this to my chin, eyes, under my eyes, and the center of my forehead. I only put a very small layer on since I don't need a strong coverage. I just use foundation to help even out the color of my face since I tend to get a lot of redness.

Then, taking a Jessup Concealer Brush, I create a barrier with foundation on my cheeks. I go a little bit below the hollows of my cheeks, but I don't blend it out yet. I use this as a barrier for my contouring. I have found by putting this little line on my face, my darker foundation for contouring is easier to control and blend out in the area that I want it to be in. This part is hard for me to explain, so please make sure you look at the video to understand what I mean by creating a barrier.

Contouring

I like to use a darker foundation for the majority of my contouring. I use the Maybelline Fit Me Shine-Free Foundation Stick in the darkest shade, Coconut. I apply this first to outline my chin and then I dot it along my jawline. Adding a darker color along your jawline helps to hide double chins. I then apply this to the hollows of my cheeks to shape my face. I first start by placing the foundation stick flat on my cheek, to make a thicker line, and then I turn it sideways, to use the edge of the stick as I get closer to my lips. I want my contour to be darker up my the top of my ear and under my cheek bone and be less drastic as it goes down my face. I also apply a small dot to my temples.

I take another one of my Jessup brushes and first blend out my jawline, then my chin, and then I start on my cheeks. I start by the top of my ears and just sweep back and forth a few times to blend it a bit before I buff it out, trying to keep it in the general area of the hollows of my cheeks and just onto the tops of my cheeks. I create a C on my face by bringing up the product to my temples and blending out the small amount of foundation I put on my temples. I make sure this is very thoroughly blended.

Then, to clean up the line, I go in with my regular foundation brush and blend out that barrier I created with my skin-toned foundation I first used. Sometimes I even add a little more product onto it to really clean up that area and make sure the contour is a line on my cheek.

Bronzer & Blush

I then go in with another Jessup Brush that is tapered at the end and use my Physician's Formula Bronzer to set my contour and bronze my face. I like a really defined line when I contour my face, so I just use a regular index card and hold it just along the contour line - right along the foundation barrier I keep talking about. I then apply my bronzer over the contour foundation, making sure to really focus on the area closest to my hairline, and then gently sweeping it down toward my cheeks and toward my lips. Then I use whatever is left on the brush to bronze my temples, chin, and jawline.

For my blush, I use a Mary Kay blush sample in the color Apricot Breeze and an unnamed blush brush. I sweep it just over the tops of my cheeks and up my temple a bit. I make sure it's seamless with my bronzer to create a natural look. Then, whatever is left on the brush I gently sweep around my face.

Setting Powder

The first thing I do is set the foundation on my neck with my NYC Color Wheel in the color Rose Glow, using my same unnamed blush brush. Then, I take my ELF High Definition Powder and a little fan brush and just sweep it under my eyes, between my eyes, on my nose, on my chin, and on my cupid's bow. This just helps add a bit of a highlight for when pictures are taken. It brightens up those areas. It doesn't make a huge difference, but I do like the look it gives used a bit of a highlighting powder.

Then I take my Physician's Formula Organic Wear face powder and my ELF Complexion Brush and stipple on the powder along the areas that I actually want to add color to. I do this on my chin, along the sides of my face, and a little bit on my forehead. After I stipple on the areas I want more product to be placed, I just sweep my brush around my entire face. Interesting fact about these large powder brushes that most people don't know: when you brush your face with powder and you think you're putting powder on your face, you're actually barely putting anything down. In fact, you're taking off more than you're putting on your face by pushing it around and knocking off excess blush or bronzer. That's why I stipple the brush in the areas I want my powder to really stick, and then just brush the rest of my face to knock off any extra blush and bronzer and just put a very light layer of powder on to blend everything out.

Well, that's all there is to my foundation routine! After this I would go on to do my brows, then my eye makeup and set everything with a setting spray, but we'll save all that for another post. If you have any questions about something I did or a product I used, let me know!

Also, check out my review on the Jessup brushes I mentioned in this post here.

Saturday, October 11, 2014

Jessup Brushes Review

I found these brushes on eBay a few months ago for a steal! I think I only spent around fourteen dollars on eBay for this set of brushes. I looked them up a bit and it turns out a few instagram makeup artists have tried them out as well. Many people have claimed that these Jessup Brushes are a dupe for some of Sigma's brushes. (If you don't know what a dupe is, click here to read my post about what a dupe is in makeup terms.) I needed to test these out and see if they were really as great as people were saying. I have been using these brushes daily for the last seven to eight months and finally feel that I know them well enough to write an accurate post on these Sigma dupes.

Here is the link to the eBay search for these brushes. I couldn't find my exact seller, but these search results are exact to the ones I had when I looked them up.

Appearance
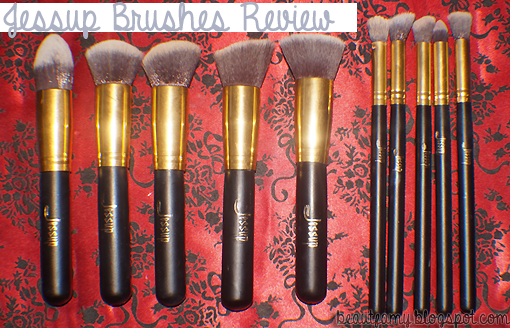
I don't care what you say, appearance does matter! After all, we are going to be rubbing these things all over our faces to try and make us look pretty - I think our utensils should at least be appealing. These brushes come in several different color options for both the wooden handles and the metal. The wood is available in pink, white, black, and I think some sellers might have it in blue as well. The metal part is available in either gold or silver. I decided to just keep it simple and went with black and gold (although I do with I would have gotten the pink handles!). The bristles of the brushes are a dark brown color with white/gray tips. And then there's the brand name, Jessup, written in gold on the handles. These brushes do not have names or numbers in order to classify them since they are a cheaper brand, but that doesn't bother me. I don't really pay attention to the names of brushes, anyway.

Here's a closer look at the color of the tips since my brushes in the above picture are slightly messy from use.

Application & Use
These brushes are made of synthetic hair which means the hair is fake. And although I'm not completely educated on the difference between synthetic and real hair, I have heard that synthetic hair helps in the application process because less product is absorbed onto the brush, and more is actually being applied to your face. I have also noticed that these brushes do not get as oily as some other ones that I have used in the past and that is because with real hair brushes, the oils stick to the hair (think of the hair on your head and how it holds oils in). Because of this, the application is smoother and the product glides right onto my face. It also helps to get more coverage since more product is going on your face.

I have really sensitive skin and I have found that these brushes are so soft and gentle on my face and I really think that has helped with lessening any breakouts I get. I feel like because the brushes are synthetic and less oils are absorbed into them, that they stay a bit cleaner. It's still essential to clean your makeup brushes for sanitary reasons, but these brushes do just feel cleaner on my face and I think that really helps with the cleanliness of my skin since the brushes aren't distributing that many old oils or old product back onto my face with each use.

Here are the brushes and the breakdown of how I use them all:

1. At first I didn't know what to use this brush for, but I've been using it for my bronzer/contouring lately and I really like it. It has a bit of a point on the end so it makes it easier to contour fine line and then the sides are great for blending it out.

2. I use this brush very rarely. It's a foundation brush that is curved over the top. I use it for buffing out and caked up areas on my face and I sometimes use it to buff out highlights and concealer. It's kind of my odd-jobs face brush.

3. This brush kind of does the same thing as the number 2 brush. Just odd-jobs here and there.

4. This a flat-top, angled foundation brush and I use it for my cream contouring. Since it's angled it really helps to blend out the lines of the dark foundation that I use for contouring.

5. This is my foundation brush that I use for my initial application of my foundation. It's a flat-top brush and works perfectly for buffing out my foundation. It's my favorite brush that I have ever used for my foundation.

6. I use this to line out my areas that I highlight (under my eyes, my cupid's bow, the center of my forehead, and my chin).

7. This brush is great for going in with some more cream contour for a darker application.

8. This brush is my concealer brush. I use it to stipple on any concealer over blemishes or red patches.

9. I use this brush for blending out my eyeshadow. This is the only brush out of this set that I don't use for foundations or concealers.

10. This is my odd-jobs brush. I use it to blend random things out that might be cakey-looking or to just smooth out any lines/creases in my foundation that I get under my eye while I'm applying.

Durability
These brushes did not feel very sturdy when I purchased them, but I continued to use them as I would with any other brush. After a couple months of use, my contouring brush (brush number 4) broke!

I was pretty upset at first, but I decided to take matters into my own hands. I used some of my Gorilla Super Glue (I love this stuff) and put the glue on the inside of the top half, and around the unpainted wood of the handle. I squeezed them together and held it in place for a minute and then let it dry overnight. Good as new! - Actually, better than new. It's really sturdy and I haven't had any problems with it since. One of my other brushes is loose now and I have my Gorilla Glue on standby for when it finally comes apart. It's not a major issue, but it does kind of suck. I'm just glad it was such an easy fix.

Overall Rating

The only con that I have encountered with these brushes was the durability, but even then, it could be easily fixed. And I think that price alone definitely outweighs that single con. These brushes are great for any level: whether you're new to makeup or a professional makeup artist. I would recommend these brushes to everybody. They feel great on my face and like I said, they're so cheap! If you really want to dish out the money for the higher-end makeup brushes, by all means, go right ahead; however, I don't feel the need to purchase something so expensive when these brushes work perfectly fine for me.

If you're looking for new foundation brushes or just looking to bulk up your brushes collection, I highly suggest purchasing these. I will continue to use these brushes until they fall apart and then once that happens, I will repurchase them.

I hope this review has helped you in some way. Let me know if you have any questions about them and also let me know what you think of these brushes if you have tried them out, too.

Photos by Jacob Medeiros

Friday, August 29, 2014

Makeup 101: What is a Dupe?

While watching or reading reviews by many internet beauty gurus, you might have come across the word "dupe." For example, while talking about some new makeup brushes the reviewer might say, "these brushes are a dupe for the Mac brushes," or with lipstick: "this lipstick is a dupe for the Lime Crime Velvetines." If you're new to makeup and its slang, you might be asking, "what the heck does dupe mean?" Well, I'm here to write a very quick post about what it means when something is a dupe.

Since the title of my blog is Beauty on a Budget, I am going to be using the term dupe quite often. Many drugstore makeup products are designed to be the more affordable version of the higher-end beauty products, therefore making many items fall under this dupe category. I will be writing reviews of products that are claimed to keep up with the big leagues: like Mac, to name the most commonly known makeup company.

Definition

If you look up the definition of dupe on Google, this is what you get:

dupe: verb 1. deceive; trick.
noun 2. a victim of deception

Now, these two definitions aren't quite accurate to how we use the term, but it's still close to the same idea. A dupe is basically a duplicate of another product. (Duplicate. Dupe. you see?) Dupes will not be 100% accurate to the performance of the higher-end product, and that's where reviews come in to inform you on what to expect when purchasing a dupe. To know how well a dupe works, you do not need to test the higher-end product. A lot of times it is safe to assume that where the dupe product lacks, the professional product probably doesn't.

Many brands that carry dupes for other companies include: Covergirl, Maybelline, Revlon, NYX, even Wet 'n' Wild and NYC. These companies do not only carry dupes, though, so just remember that; they do have their own lines of different formulas that were not created to compete with a specific product from another company. Just like in basic economics, companies are always trying to compete with one another - sometimes they target a specific formula or line of products, but sometimes they just create their own version of something.

Examples

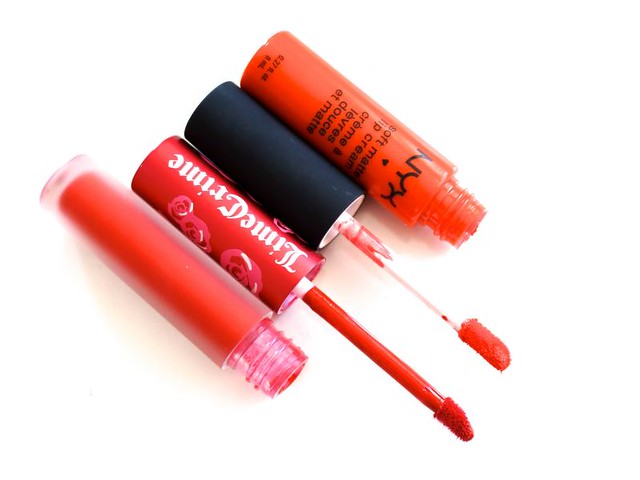
NYX Soft Matte Lip Cream is a dupe for Lime Crime's Velvetines. I got this image from Project Vanity. She also has a quick review of the two products on her blog, check it out.

Benefit Bad Gal Lash's dupe is Maybelline Great Big Lash. I found this image from Worn This Way, where she talks about several different dupes in detail.

I hope this helps you to understand what a dupe is if you didn't already know! Let me know if you have any questions or anything in the comments. Thanks for reading!

Sunday, July 13, 2014

My Chest Dermal Piercing

In the middle of January I got my chest microdermal piercing, or "dermal" as it is most commonly known as. The procedure itself was completely painless. Literally, too good to be true: it was a zero on a scale of one to ten. Here is the video of my dermal piercing, and a picture of what it looked like as soon as it was done.

The Story of my Dermal

The healing period was so easy! Everything about it, as I said before, was just too good to be true. I had to do sea salt soaks, just as you're typically supposed to do with piercings, and I had to make sure that the area around it was kept clean by gently washing the area with plain dial soap (the soap you're supposed to use for tattoos and piercings). It healed up really quickly. Until I messed it up, of course.

Long story short, I went to a concert (with Bring Me the Horizon, Of Mice & Men, Issues, and Letlive - just in case you were wondering) and while I was really into Issues's set, I was bumped by someone walking by - totally disrupting my headbanging. Needless to say, my right hand flew up and I managed to whack myself right on the piercing, pulling it out. It was so painful and I nearly doubled over in pain. It wouldn't stop hurting because I didn't realize I had pulled it out. I had my friend look at it and she said it looked like something was unscrewed or something. I decided to bite the bullet and just shoved it back in. Problem solved! The pain went away. But in the week following that, it was an infected mess. I had to soak it like crazy and the amount of puss and blood coming out of it was unreal. It went away pretty quickly though, but I still went to get it checked by my piercer to make sure everything was good. She said it was still anchored to my body, just a little raised and irritated. (I didn't tell her about the concert because I didn't want to be lectured, oops).

After that, everything was smooth sailing. It would have off-days, but nothing too out of the normal. If I would sleep on it, it would be a little sore the next day - just like any other piercing. But then, just a couple of weeks ago, I got a puppy. He's so small and cute, and I just can't help but to pick him up every chance I get - he's growing so quickly and my holding window is rapidly closing! While I was holding my puppy, he wiggled around and managed to hit my dermal. I didn't feel it at all, until the next day when it was a mess. All pussing and swollen and raised. I tried soaking it, but it only made it worse! So I decided to stop soaking it and just let my body do its thing. Apparently, whatever thing my body decided to do totally worked. It cleared up in about a week and went back to normal!

But then I got lazy about it again. And my puppy bumped it again. And now it's even more raised and I can feel the anchor of the piercing beneath my skin, meaning that it is most likely not anchored anymore. I read a post about pushing the piercing down and basically starting the entire healing process back over from square one. I tried pushing it down as hard as I could (didn't hurt) but it didn't really work. I put a bandaid over it very tightly in hopes of it staying down, but it didn't really work.

The Anatomy of a Dermal Anchor

So, that's where I am right now. And basically, I just wanted to share my experience thus far to forewarn anybody thinking about getting a dermal, specifically on your chest. They're so beautiful and painless, but the thing about dermals is that they can never really completely heal. With normal piercings (like an ear lobe, nostril, belly-button, or any typical kind of piercing) they go completely through the skin. There's an entry point and an exit point, leaving a clear passage for the jewelry - a passage that can learn to heal and stay that way. With dermals, there's this funky little thing just resting under your skin.

A dermal has an anchor, or foot, which is this little thing that sits under your skin. The anchor has small holes on it, allowing tissue to grow through the holes to keep the anchor from just floating around. Then there's the post that holds the jewelry. It's just a metal rod that protrudes out from your body and stays there. Hit that rod, and you can rip the tissue that is attached to the anchor, causing it to reject or infect or raise. Because there's constant movement from this foreign thing under your skin, it's hard for it to completely heal. Dermals are prone to randomly flaring up with infection or rejecting for absolutely no reason!

How the Dermal sits in your body:

Image found on Google Images

Small holes in the anchor:

Image found on Google Images

Dermals are so beautiful and so unique and I absolutely love them so much. I love my dermal more than anything. It's my absolute favorite piercing. You just really have to baby them and I wish I would have researched it a bit more before actually committing. I don't know if I would have made a different decision, but I definitely would have had more general knowledge about how to take care of it and how you need to constantly watch it for snags or bumps.

I hope that you guys were able to learn something from this in case you were looking to get a dermal piercing or just interested about them in general. If you have any more questions, leave a comment and I will answer you or make another blog post about anything in particular. Sorry I didn't have more pictures of my dermal! It's really quite gross, you probably don't want to see it regardless.

Sunday, June 15, 2014

10 Essential Hair-Dying Materials

There are ten items that I find myself using every time I dye my hair - whether I'm bleaching it or dying it purple. These items are essential to nearly every single dye job.

1. Clips: I use the butterfly clips that are pictured in the image above. They grab a decent amount of hair and because they are plastic, they are easily washed - which means you can get hair dye all over them! Clips are important for sectioning off your hair or moving already dyed hair out of the way. You can buy a pack of these for under ten dollars at Sally's Beauty Supply or most other beauty stores. You can probably find them for a great price on eBay or Amazon, as well. I would advise getting a pack of them and not just one or two - I use anywhere between one to five of these each time I dye my hair; depending on what kind of dye-job I am doing.

2. Hair Ties: I would suggest using black hair ties when dying your hair because even if you get dye all over them, you can't really tell because they're already black. Make sure they are not the rubbery ones - make sure they are the soft ones so they can slip in and out of your hair easier. These are also great for sectioning off your hair. I often section my hair off with a ponytail and then use one of the clips from Number 1 to clip the ponytail out of the way. (Note: Don't put hair up in bun with an elastic - you'll be wearing gloves and it's a nightmare to get the hair tie out of a bun with gloves on. Trust me, I know.)

3. Gloves: Nobody wants dyed hands! Hair dye can dye your skin for up to a week, even with constant washing! I use black latex gloves that I purchased from Sally's Beauty Supply. The ones I got are nice and thick so hair dye never gets on my hands. They're also reusable, so that's a huge plus. You can find a decent pair of latex gloves for a couple of dollars and under. (Note: Try not to use the doctor's office kind. I mean, you can use those but they are very rubbery and stick to your hair, causing a lot of unnecessary pain from the pulling. Plus, they are very thin and more prone to holes.)

4. Old Sheets/Towels: It is important to protect the area in which you plan on dying your hair. I usually dye my hair in my bathroom, so I make sure to remove the rug from the floor and clear off the counter-top completely. I then put down some old sheets to protect the floor and get old newspapers or towels to cover the counter top. Sometimes I even tape some up on the wall behind me because when you're getting the back of your head, you can flick some dye onto the wall.

5. Paper towels: It's also good to keep some paper towels handy in case you get some hair dye somewhere on your face. That way you can wipe it off before you give yourself polka dots.

6. Bobby pins: Secure back any little hairs or layers that don't fit in a ponytail or are too stubborn to remain within a clip. Sometimes already dyed little hairs can be touching your neck or even your cheek and you won't notice until after you've washed the dye out. Secure those suckers down with a bobby pin to keep your face from being striped!

7. Petroleum Jelly: This stuff works wonders. Apply some to the skin around your hairline in order to protect the skin from being dyed. It really works! Apply a decent amount - it doesn't need to be caked on, but also make sure it isn't rubbed into your skin. Put it on so it covers about an inch of your skin. You can also dip a paper towel into it and use it to rub off some dye that might have gotten on your arms or neck. It comes off easily - just use some soap or shampoo while in the shower to get it off! If there's any leftover, it will just absorb into your skin.

8. Comb: A comb is great for parting your sections and combing out any last-minute tangles. In order to make sure that you have evenly soaked your hair in dye, run a comb through it to get it all the way through. It also helps to pull out some of the excess dye to reduce your rinsing time in the shower. The comb I have pictured is available at Sally's Beauty supply and has a metal application to the handle that is used for precision when parting your hair. It is great for picking out individual hairs and sectioning them off.

9. Old shirt: Remember when you bought that t-shirt from Wal-Mart that you thought was cute but actually ended up being an embarrassing part of your wardrobe? Well, go find it! Use old, unimportant t-shirts when you are dying your hair that way you don't ruin a perfectly wearable shirt. If you don't have any old t-shirts, head on over to Target, Wal-Mart, JoAnn's, or even the dollar store and buy a simple t-shirt that you won't grow attached to. I'd also advise wearing bottoms that aren't important either. And your socks/shoes (if you're wearing any) shouldn't be important either. Globs of hair dye manage to get everywhere.

10. Bowl and brush: If you are using a box-dye, you might not need this because they usually come with a small application bottle; however, I still pour my dye into a plastic bowl and mix it around with an application brush. A bowl makes it easier to mix up your hair dye and it also helps you to see how much you have left so you can manage the portions you're using on each section. I purchased a plastic bowl similar to the one pictured at Sally's Beauty Supply for a couple of bucks. I have a cute purple one and a turquoise one. The application brush is great to help brush the hair dye onto your strands of hair. I mostly use my hands, but I do use my brush when I need to get an area with more precision - like the part or an area that is close to other hair that I am trying to avoid.

I hope you guys have found this helpful! Let me know what your essential items are in the comments.

Saturday, April 12, 2014

Review: Rihanna's Reb'l Fleur Body Mist


I purchased this item on a whim while at WalMart. I had a little extra money and found myself browsing the perfume aisle. I was first attracted to the bottle that it was in, and then I saw Rihanna's name and figured, 'hey, Rihanna probably smells nice, I wouldn't mind smelling like her.' So I bought the body mist, but the only thing is that I didn't realize it was a body mist and not a perfume (which explains a lot). I should have realized that from the price, though. But either way, the money has been spent and I have been using this body spray for about a month now and figured I'd share my experience with it.

Body Mist vs. Perfume

Before I start the actual review, I think it is necessary to describe the difference between a body mist and a perfume. I didn't know the difference until just recently, and it really is great information to have when looking at fragrances to purchase. A perfume has a stronger scent that lasts for long periods at a time. The formula has more oils and less water, making the scent more prominent. Now, a body mist is basically a watered down version of a perfume. It only lasts for about an hour at a time and the scent is a lot more subtle upon application.

Packaging

Since this is just a body mist, it does not come in any sort of box or fancy bottle. The bottle is plastic, and the decoration on the outside it just a sticker. It still looks elegant and appealing when sitting on my dresser, though. I purchased it with the sticker coming undone just a bit in the back, but when I display the bottle with the verbage facing forward, you can't even see it. Overall, it is a sturdy and cute bottle - it looks much more expensive than it is.

The Smell

When testing this in the store, the smell immediately drew me in. I usually am able to classify the different types of perfumes/body mists on a scale of fruity to spicy. This perfume is definitely on the spicy side - it has a punch to it that not everybody is fond of, but when applied, the smell is pleasant to all noses. My mother hates the spicier scents, but she complimented me before heading out one night and told me that I smelled nice.

Now, when this is actually applied, I feel like the smell just vanishes in the air and doesn't even stick to my body. As soon as I leave my room, the smell feels like it's gone. Usually when I wear a perfume, I can catch a whiff of it every now and then - my perfumes usually stick to my hair, so if my hair moves a certain way, I can smell it. With this one, the smell is gone the second I spray it.

I'd say that body mists last for about an hour on average. It is definitely a product that you'd need to keep on applying if you plan on having a long day. However, this body mist seems to last me about twenty minutes, even when I'm not sweating up a storm or on the run. It just doesn't stick - the smell vanishes so quickly and because the bottle is so clunky, it'd be too awkward to carry in my purse for reapplication.

Overall, I'd say that this body mist isn't even worth the $7.98 I spent on it. I honestly think that purchasing a body mist is a complete waste of money unless it's for a younger girl to play with. It could be a nice refresher after PE or working out just to help mask any sweaty or musky smell you might have, but even then it'll only help for a short period of time. I think that anybody would be better off just forking out the extra money to get a perfume, not a body mist.